8. Do yoga – Day 7

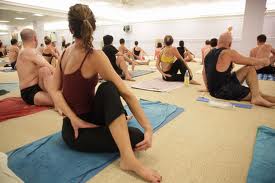
Last day of yoga and Pete will be teaching us again. Perfect way to end my one week unlimited class!

220px-Ustrasana

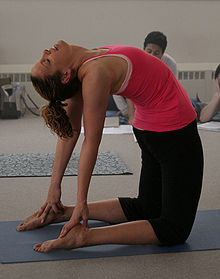
Pose 22: Ustrasana (Camel Pose)

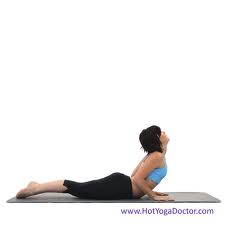
Come on top of your mat and kneel. Knees and feet should be at least 6 inches wide. Put your hand on your lower back and back backwards. Pete says, backward bending can be your worst enemy or your favorite pose, depending if you are doing it right. Relax your head then slowly grab your right heel then your left.

Since I wasn’t able to do the Fixed Firm pose, I didn’t attempt to rush this pose. I stayed with supporting my lower back while bending backwards. This hurts a little for me so I stopped there, maybe because of my scoliosis.

imagesCACAJ3J2

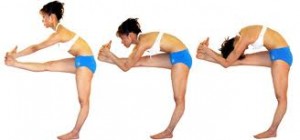
Pose 23: Janushirasana with Paschimottanasana (Head To Knee Pose with Stretching Pose)

Come to the middle of your mat, grab the ends of your towel and cover your heels. Suck your stomach in and bend forward until your forehead touches your knees. Lift your hips and roll forward. Debbie, a previous yogi master, told us that you should only put 20% of the weight on your head, it should be on the knees carrying the rest of your weight. Pull on your heels as you lift your hips higher. You should feel your lower back stretch.

imagesCAU3WREA

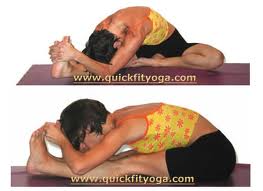
Pose 24: Janushirasana with Paschimottanasana (Head To Knee Pose with Stretching Pose)

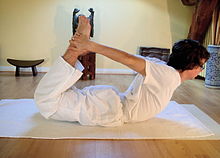
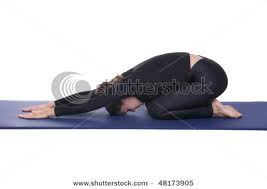
Sit up and touch your left sole to your right thigh. 5 fingers touching each other, grab your left foot and touch your forehead to your knee. You can bend your knees, the important part is touching your forehead to the knee. This is a compression pose, not a stretching one. Slowly bend your elbows until it touches the floor and lift your heels off the floor. Do this to your left.

Now, straighten both legs lie down and immediately sit up and grab your big toe with 2 fingers. Bend your knees to touch your big toe if you have to. If you did bend your knees, slowly walk your hips back as much as you can. When your legs are straight, touch your forehead to your knees, elbows touching the floor and lift your heels up.

imagesCA6N6DO5

Pose 25: Ardha – Matsyendrasana (Spine Twisting Pose)

Face the left side of the room. Fold your left leg and put your right foot in front of your left knee. Touch you left elbow to your right knee, hands touching the left knee. With your right hand try to grab you left thigh through your back. Twist your head towards the back of the room while using your left arms to push on your right knee. It looks complicated but I love this pose.

imagesCAFS1D3D

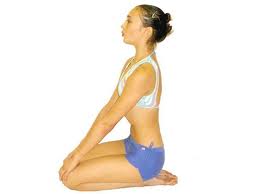
Pose 26: Khapalbhati (Blowing In Firm Pose)

The last pose of the series is, again, a breathing exercise. Sit up on your heels. Back straight. Chin up. Put your hand on your knees and exhale using your abdomen muscles. Inhale comes naturally.  Then faster for the second set.

That’s it. I’m survived 7 consecutive days of yoga. I really really want to go back to Pete’s or Debbie’s class. I’m missing yoga already as I type. Yes, it may be costly, but it sure feels great.

8. Do yoga – Day 6

Day 6, my love for yoga returns. Our yogi is Pete. The most important thing for him is your form, he won’t push you to do the pose when he thinks your body isn’t ready for the pose yet. Remember the Eagle pose? I thought I was doing it right already, only today did I learn that I got my hands were mixed up. Haha. I learned so much today it was like my first yoga class ever. And the best one at that. He makes jokes during class and moves around to see how his students are doing with each pose.

imagesCACLK1OK

Pose 17: Salabhasana (Locust Pose)

On your tummy and chin touching the mat, place your hands under your body and try to grip the floor. The force must be on your finger tips and not your palms. Little fingers must touch each other and the elbows must be hidden. This really hurts. If it does, I think you should stop there, just like what I do. If you can, lift your right leg 45degrees. Then your left. Then kiss your mat and lift both legs as high as you can at the same time. Lips must touch the floor, this prevents your neck from getting hurt.

1

Pose 18: Poorna – Salabhasana (Full Locust Pose)

Still on your stomach, spend your arms to the side. Heels and toes must be touching. Slowly lift your arms, feet and body off the floor like an airplane. Look at the ceiling.

220px-Dhanurasana

Pose 19: Dhanurasana (Bow Pose)

Spread your knees 6 inches wide and grab the back of your ankles. Then kick as hard as you can to strech your spine.

2

Pose 20: Supta – Vajrasana (Fixed Firm Pose)

Sit Japanese style with your heels touching the side of your hips. Touch the sole of your feet, fingers out, palms in. Slowly loer your right elbow to the floor then the left. Lie down on your back and otuch your elbows over your head. Arch your back towards the ceiling. Knees must not leve the floor.

For the last 5 days I have been pushing myslef to do this pose. My knees lifting from the floor but I’m trying. Not tonight. Pete asked me to stop and just sit Japanese style, hips between my heels. He explained that my body is not yet ready for this pose. Forcing it may tear my hamstrings and things would get ugly. So I was happy that the yogi was paying enough attention to his students to notice when to make them stop and when to push them. I wanted to do yoga and have fun without hurting myself. Thank you.

imagesCAU0E36P

Pose 21: Ardha – Kurmasana (Half Tortoise Pose)

Sit Japanese style again, this time sitting on your heels. Amrs up, thumbs crossed. Suck your stomach in to support your lower back. Slowly touch your forhead and hands to the floor. Reach as far as you can and pull your shoulders down, away from the ears. Hips must not leave the heels. Stretch your shoulders and spine. Suck your stomach in again when you come up.


Lesson for today: Since I did learn alot today, my favorite one is know when to stop. Forcing your body to do the pose may hurt you instead of helping you. Don’t rush it.

8. Do yoga – Day5

Day5, I didn’t feel all that good during class. It felt too much, and I wasn’t sure I will continue after the session. Plus I ate too late and felt I would throw up in between the poses so I spent alot of time in Savanasa or just lying down on my mat. Boo!

The last pose I posted in my previous entry, Padangustasana, was the last one for the standing series. The next poses will be part of the sitting and lying down series. This is just the beginning of the real yoga, so they say.

350px-Shavasana

Pose 13: Savasana (Dead Body Pose)

You need to catch your breath and relax those muscles. In this pose you lay down, palms up, shoulders are relaxed and eyes open. Try to identify the parts of your body that are tense and relax them.

imagesCAW0M2RA

Pose 14: Pavanamuktasana (Wind Removing Pose)

Fold your right knee and push it towards your right shoulder to open up the ribcage, chin tucked to your chest and release. Do the same thing to the left. Now, Lift both knees up and hug them to your chest. Try to grab both elbows, if you can’t, touching your forearms will be fine. Tuck your chin to your chest and pull on your knees. Try not to lift your hips of the floor. Eventually, your spine will be flat on the floor. This pose feels real good on the spine, you’ll feel it stretch if you’re doing it correctly. Before you proceed to the next pose, go back to Savasana for a minute.

This pose is said to massage the colon. Plus it really feels good. Haha.

Pose 15: Pada-Hasthasana (Hands to Feet Pose)

We don’t do this in class since we already did it during the first few poses during the standing series. Let’s skip this pose since I already mentioned it here.

index

Pose 16: Bhujangasana (Cobra Pose)

Lay on your stomach and put your hands next to your chest, all fingers touching. Toes and heels touch and lock your legs. Now look up to the ceiling. Don’t use your arms. Use your back. Look up, only your tummy should be touching the floor. Hold then release and do it on the other side.

8. Do yoga – Day 4

Day 4, our yogi is Ms. Marivic.

Triangle-Pose

Pose 9: Trikonasana (Triangle Pose)

I love this pose and is one of my favorites on the standing series. This is suppose to stimulate the nervous system and align the spine. 

Face the left side of the room. Arms up and take a big step sidewards and bring your arms parallel to the floor on both sides. Take a big step to your right. Bend your right knee making it parallel to the floor. Bounce on your hips to make sure you are sitting low enough. Slowly rotate your arms simultaneuosly until your left hand is pointing towards the ceiling and your right hand touching the space between your big toe. Your entire body weight must be on your legs, absolutely no pressure on your fingers touching your toes. Touch your chin to your left shoulder and hold. Come up and do it on the other side. wpid-Photo-Nov-6-2011-934-PM

Pose 10: Dandayamana – Bibhaktapada – Janushirasana (Standing Separate Leg Head To Knee Pose)

This pose is said to boost your immune system so that you don’t get sick that often.

Still facing the left side of the room, arms up, thumbs crossed. Take a big step to the right and face the mirror infront of you. Twist your hips a couple of time to make sure that your hips are in one line. Slowly bend forward, fingers touching the floor and forehead touching your knee. If you can’t touch your forehead to your knee, bend it a little. It is important that you forhead touches your knee while you reach for the floor.

HP_209_Tadasana_248

Pose 11: Tadasana (Mountain Pose)

Stand straight, body weight on your heels and breath. This helps you catch your breath before you continue with the next poses.

12

Pose 12: Padangustasana (Toe Stand Pose)

Shift your weight to you left leg, grab your right foot with your eft hand and touch it to your thighs, sole of your feet facing the ceiling. Raise your right hand to your chest. When you feel you wont lose your balance, raise your left hand to your chest. Hold, then do it to your right side.

13

Stand on your two feet, shift your weight to your right leg to your left thigh again and touch both hands to your chest. Slowly bend forward and touch the floor with your hands. Bend your knees and sit on your heels. Use your arms to balance your self. When you can, bring your hands to your chest. I still need to balance myself with one hand. Close enough to the proper form, so that made me real happy. Haha.

8. Do yoga – Day3

Day3 yogi master is Ms. Marivic. I’m not really sure but I have a strong feeling she’s new. It’s the way she carries herself during class, but she’s okay. There were some poses done only once and she forgot some details in other poses as well. But what affected me the most was her counting. It was so slow. I don’t remember holding those poses for that long. I found myself releasing the poses before her instructions. I have no idea how long to hold each pose but it did feel a lot longer.

All things taken into consideration, I am thinking of continuing taking classes. Maybe mid next year. I know that would be a long time to wait but I had other things to fix first before anything else.

Anyway, back to the next poses. Again, this is NOT a tutorial. Go attend class for proper training. You would need someone to tell you when to stop and point out what you’re doing wrong.

standing-head-to-knee-pose-300x140

Pose 5: Dandayamana – JanuShirasana (Standing Head To Knee Pose)

Shift your weight to your left leg, grab the sole of your right foot and kick. When you can, lower your elbows below your calves, slowly touch your forehead to your knee. It looked pretty simple but I am no where near perfecting this pose. I couldn’t straighten my knees yet. Maybe after a few more classes? Haha.

perfect-Standing-pulling-Bow-pose-205x300

Pose 6: Dandayamana – Dhanurasana (Standing Bow Pulling Pose)

Touch your right elbow to your sides and extend your palms sidewards, palms up. Drop your hands and grab the back of your right ankle, toes pointing to the ceiling. Raise your left arms to the ceiling. Kick your right leg as hard as you can. When you can’t go any higher, lower your body slowly, continue kicking. Kick harder and you can stay in this pose forever, according to Ms. Marivic.

Balancing-stick-pose

Pose 7: Tuladandasana (Balancing Stick Pose)

Hands clasped together, index finger pointing up, arms touching your ears the entire pose. Take a big step forward, shift your weight to the leg you stepped forward with, lower your body and slowly lift your leg. Stomach in, and hold. Your body must look like a letter T on the side. Repeat in the other side.

Standing_separate_leg_stretching_pose-perfectly-executed-300x225

Pose 8: Dandayamana – Bibhaktapada – Paschimottanasana (Standing Separate Leg Stretching Pose)

Turn to your left and look in the mirror. Arms up, reach for the sky. Take a side step to the right and bring your arms down parallel to the floor. Bend forward and grab your ankles. If you cant grab your ankles, grab your toes. Touch your head to the floor. If you can’t touch your head to the floor, open your legs more. My problem with this pose is I couldn’t touch my ankles or toes, much less touch my head to the floor. According to my research, this pose is about  letting go of your fear. Once you perfect this pose, you’ll trust the universe so much more. Wow. That made so much sense.

Update: I was so happy I was able to do the Eagle pose today!

Lesson for the day: Do not blink. If you do, you may lose your balance.

Day 4, here I come!

8. Do yoga – Day2

Our yogi master for our second day is Ms. Debbie. She was gentle and forgiving. She explains each pose; what it does to your body and its benefits. She allows us some rest and tells you when to stop and work on your form instead of forcing yourself to do the poses. Day 2 was more exhausting but I enjoyed it more. I felt lighter after class. I’m starting to enjoy this. 🙂

To give you an idea on what we do inside, here are some poses. This is NOT a tutorial in in anyway. This is (again) to give you an idea on Bikram poses. Better to attend classes for a more thorough explanation, also it would better if you have someone to tell you what you are doing wrong.

The three of the studio’s walls are covered with mirrors. Make sure you can see yourself in the mirror, if someone is covering you, move your mat around until you can see yourself in the mirror. It is important for you to be able to see your form during the poses. Each pose is done twice.

images2Pose 1: Pranayama (Standing Deep Breathing)

This pose prepares your body for the next poses. Body weight on your heels. Clasp your hands together like praying and place them under your chin. Breath in using your throat and frame your face with your hands. Open your mouth wide and exhale with a slow “haaa” sound while pushing your head back until your elbows touch. Keep your spine straight. Then inhale while bringing your elbows up. Relax your shoulders during the entire pose. You wouldn’t believe how much you’d sweat doing such a simple pose. Haha.

Bikram-Half-Moon-Pose-Variation-300x205

Pose 2: Ardha Candrasana with Pada-Hastasana (Half Moon Pose with Hands To Feet Pose)

Stand straight, clasp your hands together over your head and point your index finger upwards. Make sure your palms are touching, elbows touching your ears, chin up. Slowly bend to your right, go back to your center then to the left. I’m not sure of the counting on any these poses so, listen to your yogi master. This is good for your colon, if I remember Ms. Debbie’s words correctly.

padahastasana

After bending backwards and trying to touch the wall behind you, we now do the Pada-Hastasana or Hands To Feet Pose. Bend forward, bend your knees if you have to and grab your heels. All fingers must be under your heel, forearms must be at the back of your calves. Lock your knees and pull on your heels and lift your hips.

utkatasana-part-one

Pose 3: Utkatasana (Awkward Pose)

I am still having troubles with this pose. Feet six inches apart or two fists apart. Arms forward, five fingers touching, feet flat on the floor then slowly sit down on the (imaginary) chair. Remember to keep your spine straight. Stick your butt out if you have to but your thighs must be parallel to the floor.

Slowly stand up. Balance on your toes as if someone from the ceiling is grabbing your hair upwards and sit back on the chair. Standing on tiptoe was already a challenge for me so imagine how difficult sitting down on an imaginary chair is. Hold. Stand up slowly.

And this is the hardest part of the pose for me. lock your knees together then slowly sit a few inches before touching your heels. I usually fall down on the floor at this point. Haha. Ms. Debbie says it would be easier if you lift your heels higher off the floor. Guess I need more practice pose. Haha.

Lia-Pardy-in-Eagle-Pose-178x300

Pose 4: Garudasana (Eagle Pose)

This pose is tricky. Shift your weight left foot then wrap your right one around it. All five toes of your right foot must be visible in the mirror. For beginners, bring it as far as you can.

For your arms, swing around each other right elbow under the left. Both thumbs must be pointing or near your face. Palms touching. Hands and knees should be aligned. Shoulders in one line. Repeat using the other side.

Lesson for the day: This is no competition. As long as you try your best in every pose, you get 100% of its benefits. Thank you, Ms. Debbie. I wish you could be my yogi master in another class. I enjoyed it very much.

That’s all for now. Will talk about the rest of the poses in my succeeding posts. Need to get ready for Day3. ^__^